
StaffFlow Employee Management System
A selected portfolio piece by Rohail Khan, highlighting the idea, approach, execution, and outcome behind the work.
Project Overview
StaffFlow is a secure, cloud-deployed Employee Management System backend developed using .NET 10, ASP.NET Core Web API, Entity Framework Core, ASP.NET Core Identity, JWT Authentication, and MySQL.
The project provides a complete REST API for managing employees and departments. It demonstrates backend development concepts such as CRUD operations, relational database design, authentication, authorization, role management, search, filtering, pagination, validation, exception handling, API documentation, Docker containerization, and cloud deployment.
The application follows a clean Controller-Service architecture. Controllers receive HTTP requests, services handle business logic, Entity Framework Core communicates with the database, and DTOs are used to control API request and response structures.
Main Features
Employee Management
Administrators can perform complete employee CRUD operations:
-
Create a new employee
-
View all employees
-
View an employee by ID
-
Update employee information
-
Delete an employee
-
Assign an employee to a department
-
Mark an employee as active or inactive
Each employee record includes information such as first name, last name, email, phone number, job title, hiring date, salary, active status, and department.
Employee email addresses are unique, and an employee cannot be created with an invalid or nonexistent department.
Department Management
The API also provides complete department management functionality:
-
Create departments
-
View all departments
-
View a department by ID
-
Update department information
-
Delete departments
Department names must be unique. A department containing employees cannot be deleted until its employees are transferred or removed.
JWT Authentication
The system uses JWT token-based authentication.
A user first logs in using an email address and password. After successful login, the API returns a JWT access token. This token must be included in the authorization header when accessing protected endpoints.
The token contains the user’s identity, email address, assigned role, and expiration time. The API validates the token signature, expiration, issuer, audience, and role before allowing access.
Role-Based Authorization
The system contains two roles:
Admin
The Admin has full access and can:
-
View employees and departments
-
Create employees and departments
-
Update employees and departments
-
Delete employees and departments
-
Search, filter, and paginate employee data
User
A normal User has read-only access and can:
-
View employees
-
View employee details
-
View departments
-
Search and filter employee data
A normal User cannot create, update, or delete records. These protected operations return a 403 Forbidden response when attempted with a User account.
Employee Search, Filters and Pagination
Employees can be searched using:
-
First name
-
Last name
-
Email address
-
Job title
Employees can also be filtered by:
-
Department
-
Active status
-
Inactive status
Multiple filters can be combined in a single request.
Pagination is included to manage employee records efficiently. The API accepts page number and page size parameters and returns the total number of records and pages. The maximum allowed page size is 100.
Technology Stack
-
.NET 10
-
ASP.NET Core Web API
-
C#
-
Controller-based architecture
-
Entity Framework Core
-
MySQL / MariaDB
-
ASP.NET Core Identity
-
JWT Authentication
-
Role-based Authorization
-
OpenAPI
-
Scalar API Documentation
-
Docker
-
Git and GitHub
-
Render Cloud Hosting
-
Aiven Managed MySQL Database
The project is containerized using Docker and deployed on Render. The production database is hosted using Aiven Managed MySQL with an encrypted TLS connection.
How to Test the Live Project
Step 1: Open the Scalar API Interface
Open the live Scalar API documentation:
https://employee-management-api-kfpo.onrender.com/scalar/v1
The main project URL also redirects to the Scalar interface:
https://employee-management-api-kfpo.onrender.com
The API also provides:
Health Check
https://employee-management-api-kfpo.onrender.com/health
OpenAPI JSON
https://employee-management-api-kfpo.onrender.com/openapi/v1.json
The Scalar interface displays all available authentication, employee, and department endpoints.
The API is hosted on Render’s free service. If the service has been inactive, the first request may take approximately 30–60 seconds while the server starts. Refresh the page or retry the request if it does not respond immediately.
Step 2: Test the Health Endpoint
Open:
GET /health
A successful response should be:
{
  "status": "healthy"
}
This confirms that the deployed API is running and accepting requests.
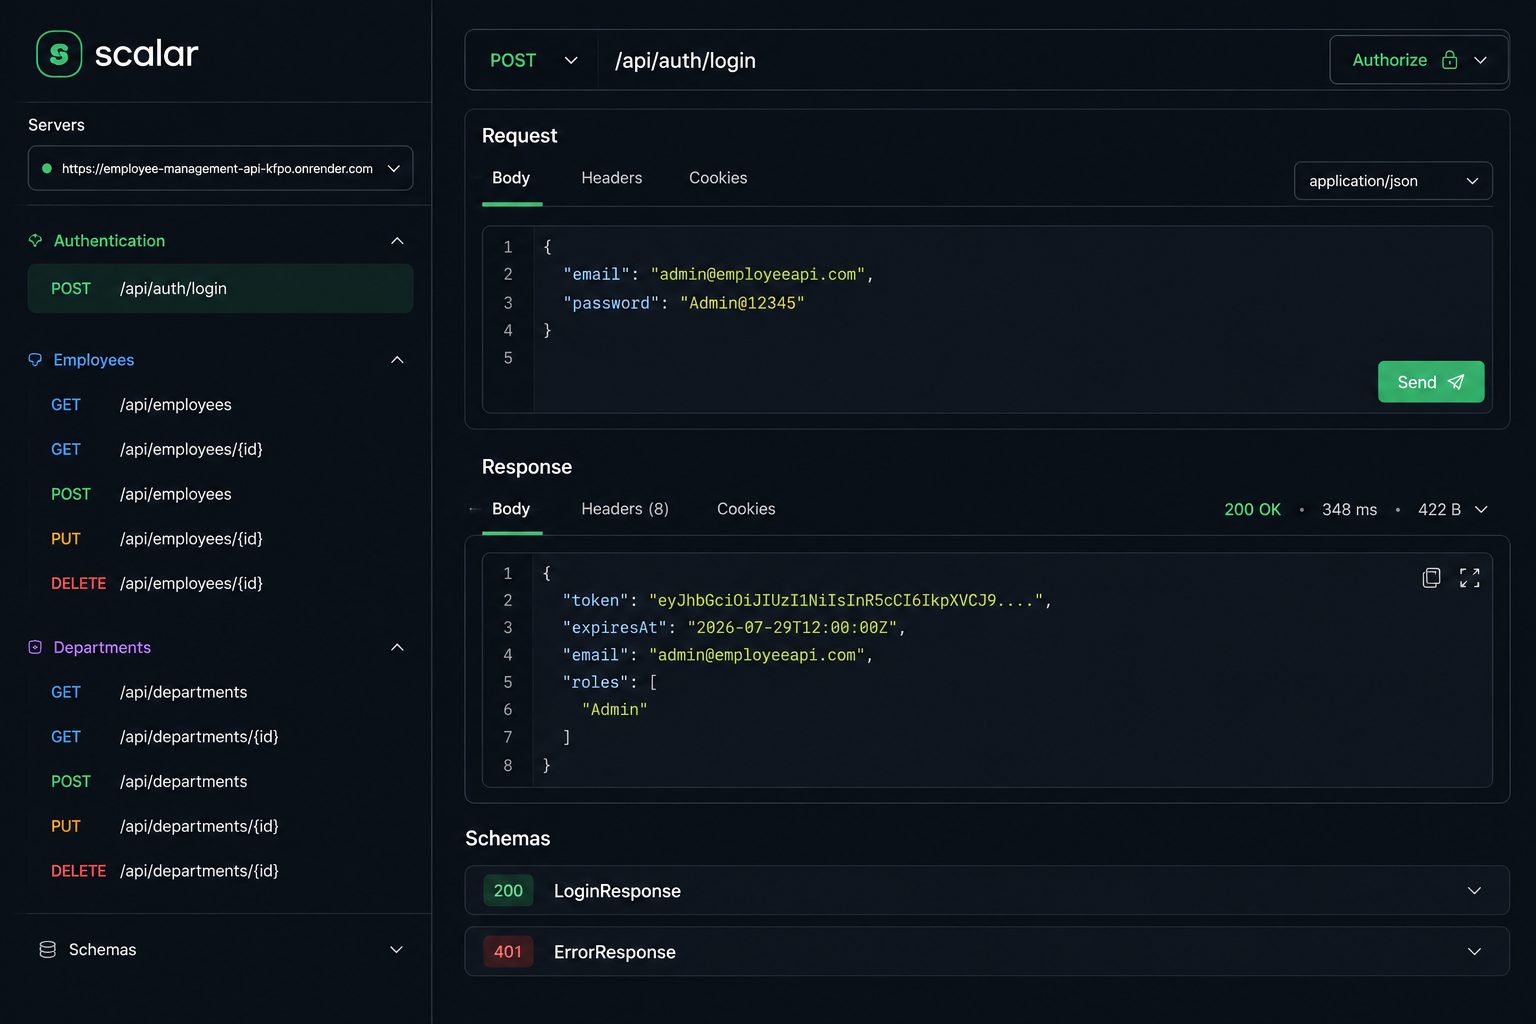
Step 3: Login as Admin
In Scalar, open:
Authentication → POST /api/auth/login
Click the option to test or send the request.
Enter the following request body:
{
  "email": "admin@employeeapi.com",
  "password": "Admin@12345"
}
After sending the request, the API should return:
-
JWT access token
-
Token expiration time
-
User email
-
Admin role
Example response:
{
  "token": "JWT_TOKEN_HERE",
  "expiresAt": "2026-07-29T12:00:00Z",
  "email": "admin@employeeapi.com",
  "roles": [
    "Admin"
  ]
}
Copy the returned token.
Step 4: Authorize Protected Requests
Click the Authorize button available in Scalar.
Enter the token in this format:
Bearer YOUR_JWT_TOKEN
Replace YOUR_JWT_TOKEN with the token received from the login response.
After authorization, Scalar will include the token with protected requests.
Step 5: View Departments
Open:
GET /api/departments
Send the request.
The seeded database includes these default departments:
-
IT
-
HR
-
Finance
Both Admin and User accounts can view departments.
Step 6: Create a Department
Login and authorize using the Admin account.
Open:
POST /api/departments
Enter:
{
  "name": "Marketing",
  "description": "Marketing and advertising department"
}
Send the request.
A successful request creates the department. A duplicate department name will produce a validation or conflict response because department names must be unique.
Step 7: View Employees
Open:
GET /api/employees
Send the request.
You can also use pagination:
GET /api/employees?page=1&pageSize=10
The response contains:
-
Employee records
-
Current page
-
Page size
-
Total employee count
-
Total pages
Step 8: Create an Employee
Make sure you are authorized using the Admin token.
Open:
POST /api/employees
Enter:
{
  "firstName": "Ali",
  "lastName": "Khan",
  "email": "ali.khan@example.com",
  "phone": "03001234567",
  "jobTitle": "Software Engineer",
  "hireDate": "2026-07-29",
  "salary": 85000,
  "isActive": true,
  "departmentId": 1
}
Send the request.
A successful request returns:
201 Created
Possible validation errors include:
-
Duplicate employee email
-
Invalid email format
-
Missing required fields
-
Negative salary
-
Department does not exist
Step 9: Update an Employee
Open:
PUT /api/employees/{id}
Replace {id} with the employee ID.
Example:
PUT /api/employees/1
Enter the complete updated employee information:
{
  "firstName": "Ali",
  "lastName": "Khan",
  "email": "ali.khan@example.com",
  "phone": "03001234567",
  "jobTitle": "Senior Software Engineer",
  "hireDate": "2026-07-29",
  "salary": 120000,
  "isActive": true,
  "departmentId": 1
}
A successful update returns:
204 No Content
Step 10: Search Employees
Use the search query:
GET /api/employees?search=ali
The API searches employee:
-
First name
-
Last name
-
Email
-
Job title
Step 11: Filter Employees
Filter by department:
GET /api/employees?departmentId=1
View active employees:
GET /api/employees?isActive=true
View inactive employees:
GET /api/employees?isActive=false
Combine search and filters:
GET /api/employees?search=developer&departmentId=1&isActive=true
Step 12: Delete an Employee
Open:
DELETE /api/employees/{id}
Replace {id} with the employee ID.
A successful deletion returns:
204 No Content
If the employee does not exist, the API returns:
404 Not Found
Only an Admin can delete an employee.
How to Test Role-Based Access
Login as Normal User
Open:
POST /api/auth/login
Enter:
{
  "email": "user@employeeapi.com",
  "password": "User@12345"
}
Copy the returned token and authorize Scalar using:
Bearer USER_JWT_TOKEN
The User account can successfully access:
-
GET /api/employees -
GET /api/employees/{id} -
GET /api/departments -
GET /api/departments/{id}
Now try:
POST /api/employees
The API should return:
403 Forbidden
This confirms that role-based authorization is working correctly and that normal users cannot modify employee records.
Important HTTP Responses
-
200 OK— Request completed successfully -
201 Created— New record created -
204 No Content— Record updated or deleted successfully -
400 Bad Request— Invalid request data -
401 Unauthorized— Token is missing, expired, or invalid -
403 Forbidden— User does not have the required role -
404 Not Found— Requested record was not found -
409 Conflict— Duplicate or conflicting operation -
500 Internal Server Error— Unexpected server error
Deployment and Security
The application is deployed through GitHub, Docker, Render, and Aiven MySQL.
The source code is stored on GitHub. Render builds the Docker image, runs the API container, provides the public HTTPS URL, stores production environment variables, monitors the health endpoint, and automatically redeploys the application when changes are pushed to GitHub.
Sensitive values such as the production database password, JWT signing secret, and production connection string are not stored in the public GitHub repository. They are securely stored as Render environment variables.
The project includes:
-
Identity password hashing
-
JWT signature validation
-
Token expiry validation
-
Issuer and audience validation
-
Role-based authorization
-
Unique employee emails
-
Unique department names
-
Request DTO validation
-
Centralized exception handling
-
Protected modification endpoints
-
Secure TLS database connection
-
Pagination limits
-
Secrets stored outside GitHub
Current Project Scope
StaffFlow is currently a backend REST API project. It does not include a graphical frontend dashboard.
The API can be tested through:
-
Scalar API documentation
-
Postman
-
PowerShell
-
cURL
-
A future React, Angular, or Vue frontend
Potential future improvements include a React admin dashboard, user management, refresh tokens, password reset, employee profile images, audit logs, automated testing, rate limiting, email notifications, and GitHub Actions CI/CD.